


WithPoly.com - The next generation of texture creation
WithPoly is a web-based platform designed for searching and generating AI-powered textures. This tool goes beyond simply generating images; It can tile textures, upscale them to 8k resolution, and generate PBR maps that can be downloaded directly in 32-bit EXR format.
This innovative method of generating textures addresses a specific gap between conventional texture creation techniques with for example Substance, Photoshop, or Affinity Designer, and the option to purchase pre-made textures. While the latter may not always offer exactly what we require and traditional methods can be time-consuming, image generation provides an additional solution to meet our creative needs or requirements.
Video: “Faces”
Before I’ll go any further, it’s important to take caution and be aware of possible risks using any AI-powered tool. Any user should have full knowledge and understanding of the application for which they intend to use AI while also demonstrating respect for existing intellectual properties. Blindly relying on the outcome of any material produced by AI must be avoided, and it is crucial to carefully examine any generated output.
This blog post will primarily cover the manual procedure for creating textures using WithPoly. It will also provide additional workflows that includes CaptureOne and Cinema 4D. The topics will range from creating patches, uploading images, making images seamless, upscaling them, and finally converting them into PBR maps.
Video: AI workflow and Cinema 4D
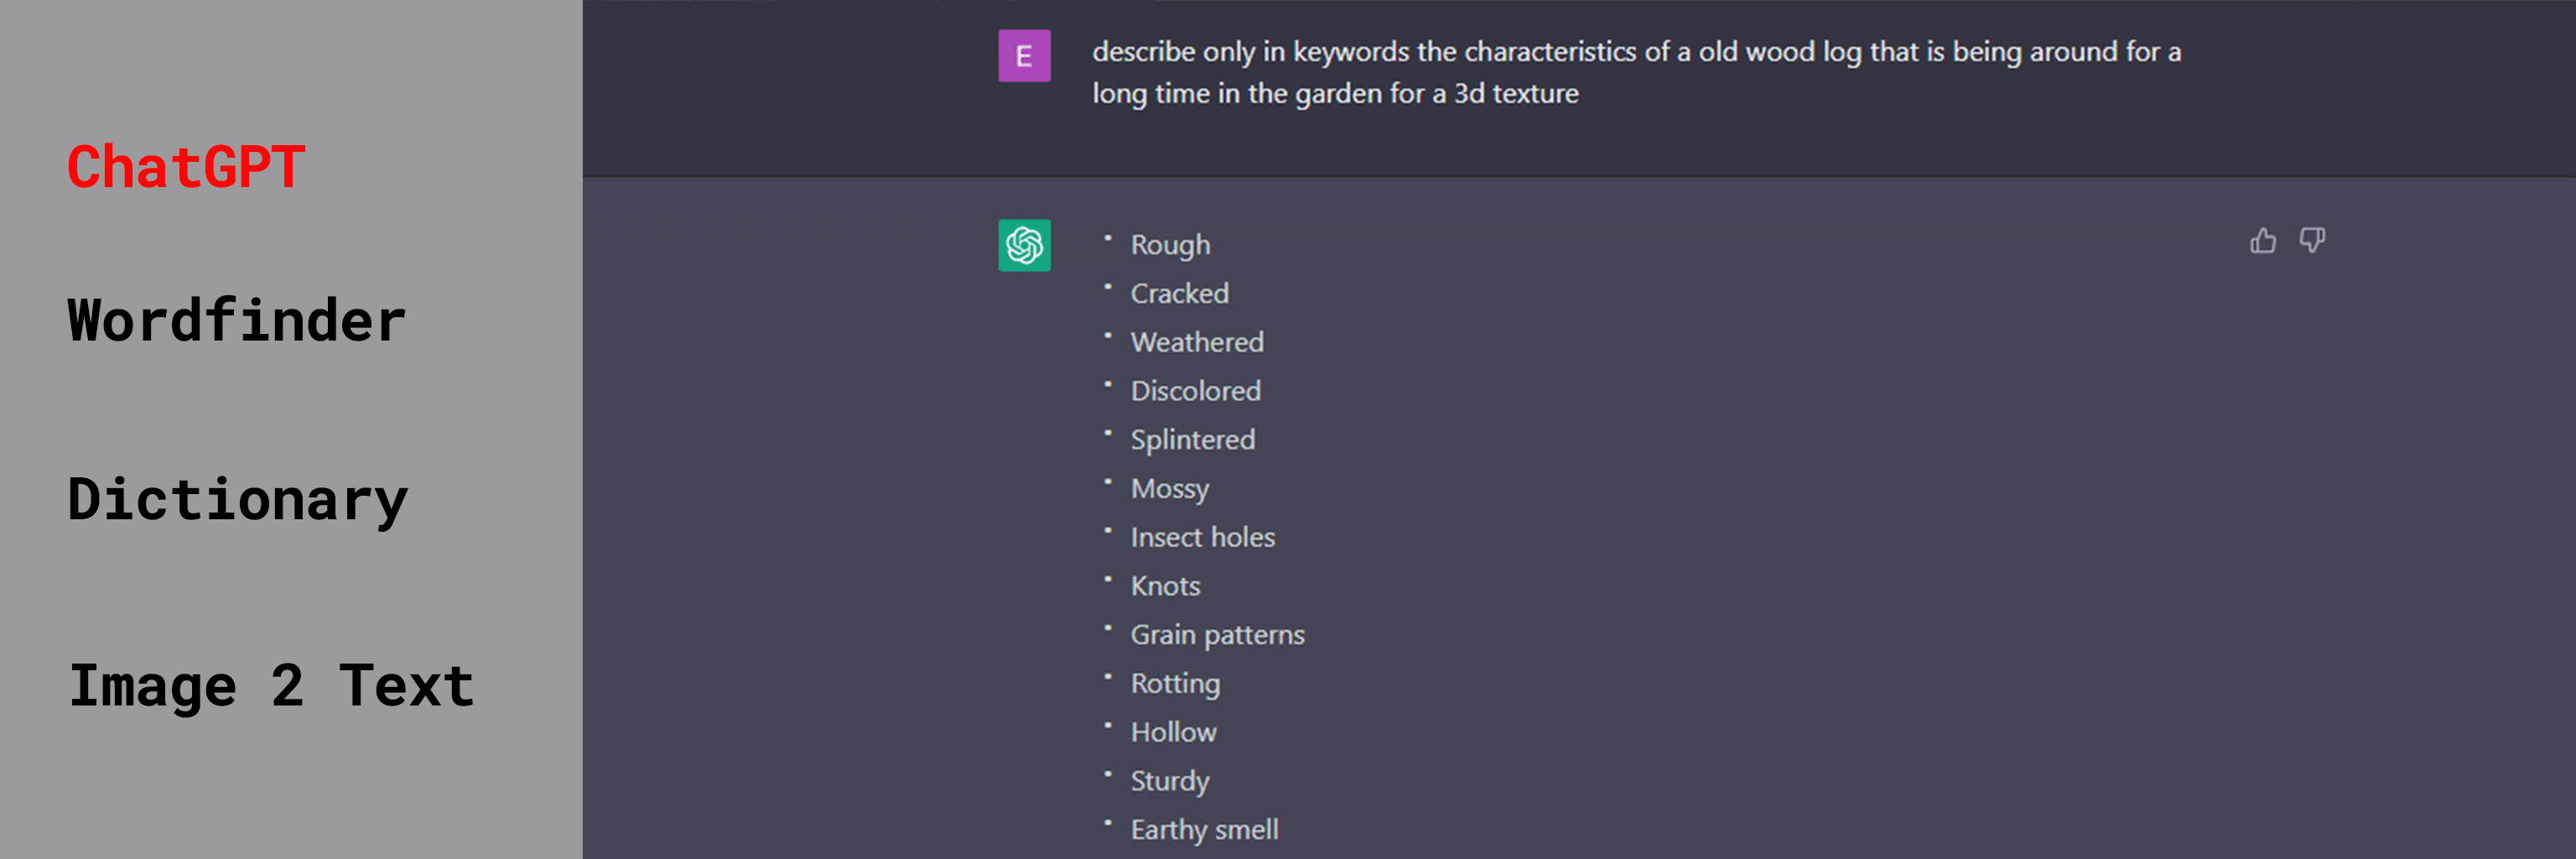
1. Meaningful input for an effective prompt?
Making patches is the initial step to create a new texture. The key consideration is determining the most suitable input to produce the desired output. Given the character limit of 240, I recommend using keywords to generate the best possible results. However, longer lines of text can also be effective, but try to embed as much detail as possible. These other AI powered tools can help you get all the keywords you need:
ChatGPT: https://chat.openai.com/
Just put in this line of text and replace the blue text with your own input
“describe only in keywords the characteristics of a old wood log that is being around for a long time in the garden for a 3d texture”
Wordfinder: https://www.whatwordisthat.com/
The word is on the tip of my tongue….. Describe it and get your answer
Dictionary: https://gptionary.com/
Describe what your thinking and get a prompt as return, which can help you understanding how AI interprets inputs
Image 2 Text: https://replicate.com/methexis-inc/img2prompt
As it is common to work with existing images, understanding how an AI interprets an image can be incredibly valuable. This knowledge is particularly helpful when it comes to adding new content to an image while ensuring that it aligns with the correct context.
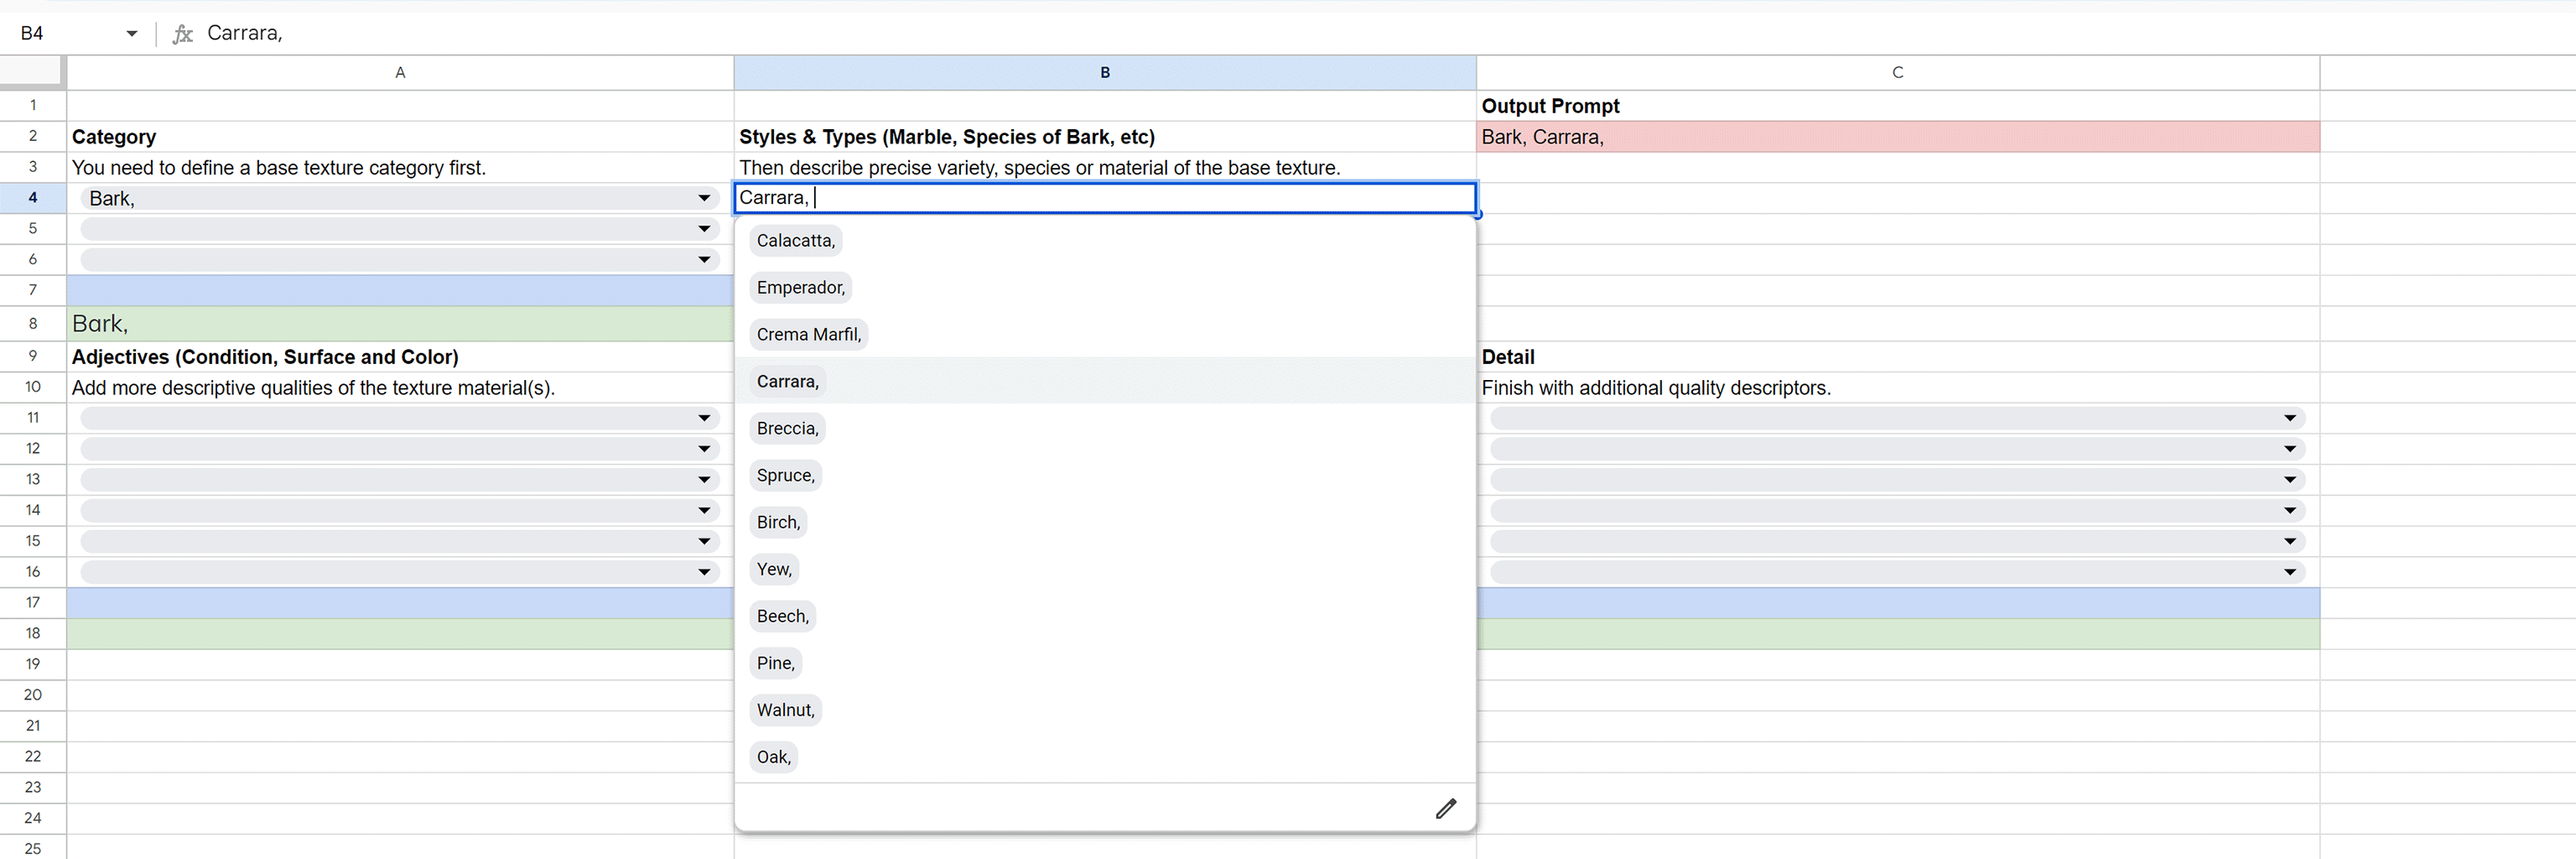
WithPoly's documentation outlines the best practices for stacking keywords. To streamline this process and increase efficiency, I have created a simple spreadsheet that I use to generate prompts. As I can continuously add new keywords to this document, its usability continues to improve with every use. To help others build their own keyword library, I have made this document available for free download and works with google sheets and microsoft excel.
2. Enhance your prompt with a seed image
Adding a seed image into your prompt can be very helpful in several ways.
Firstly, you can select a seed image from one of the generated outputs resulting from the prompt. This way, you can lock in a specific outcome and generate new variations based on it.
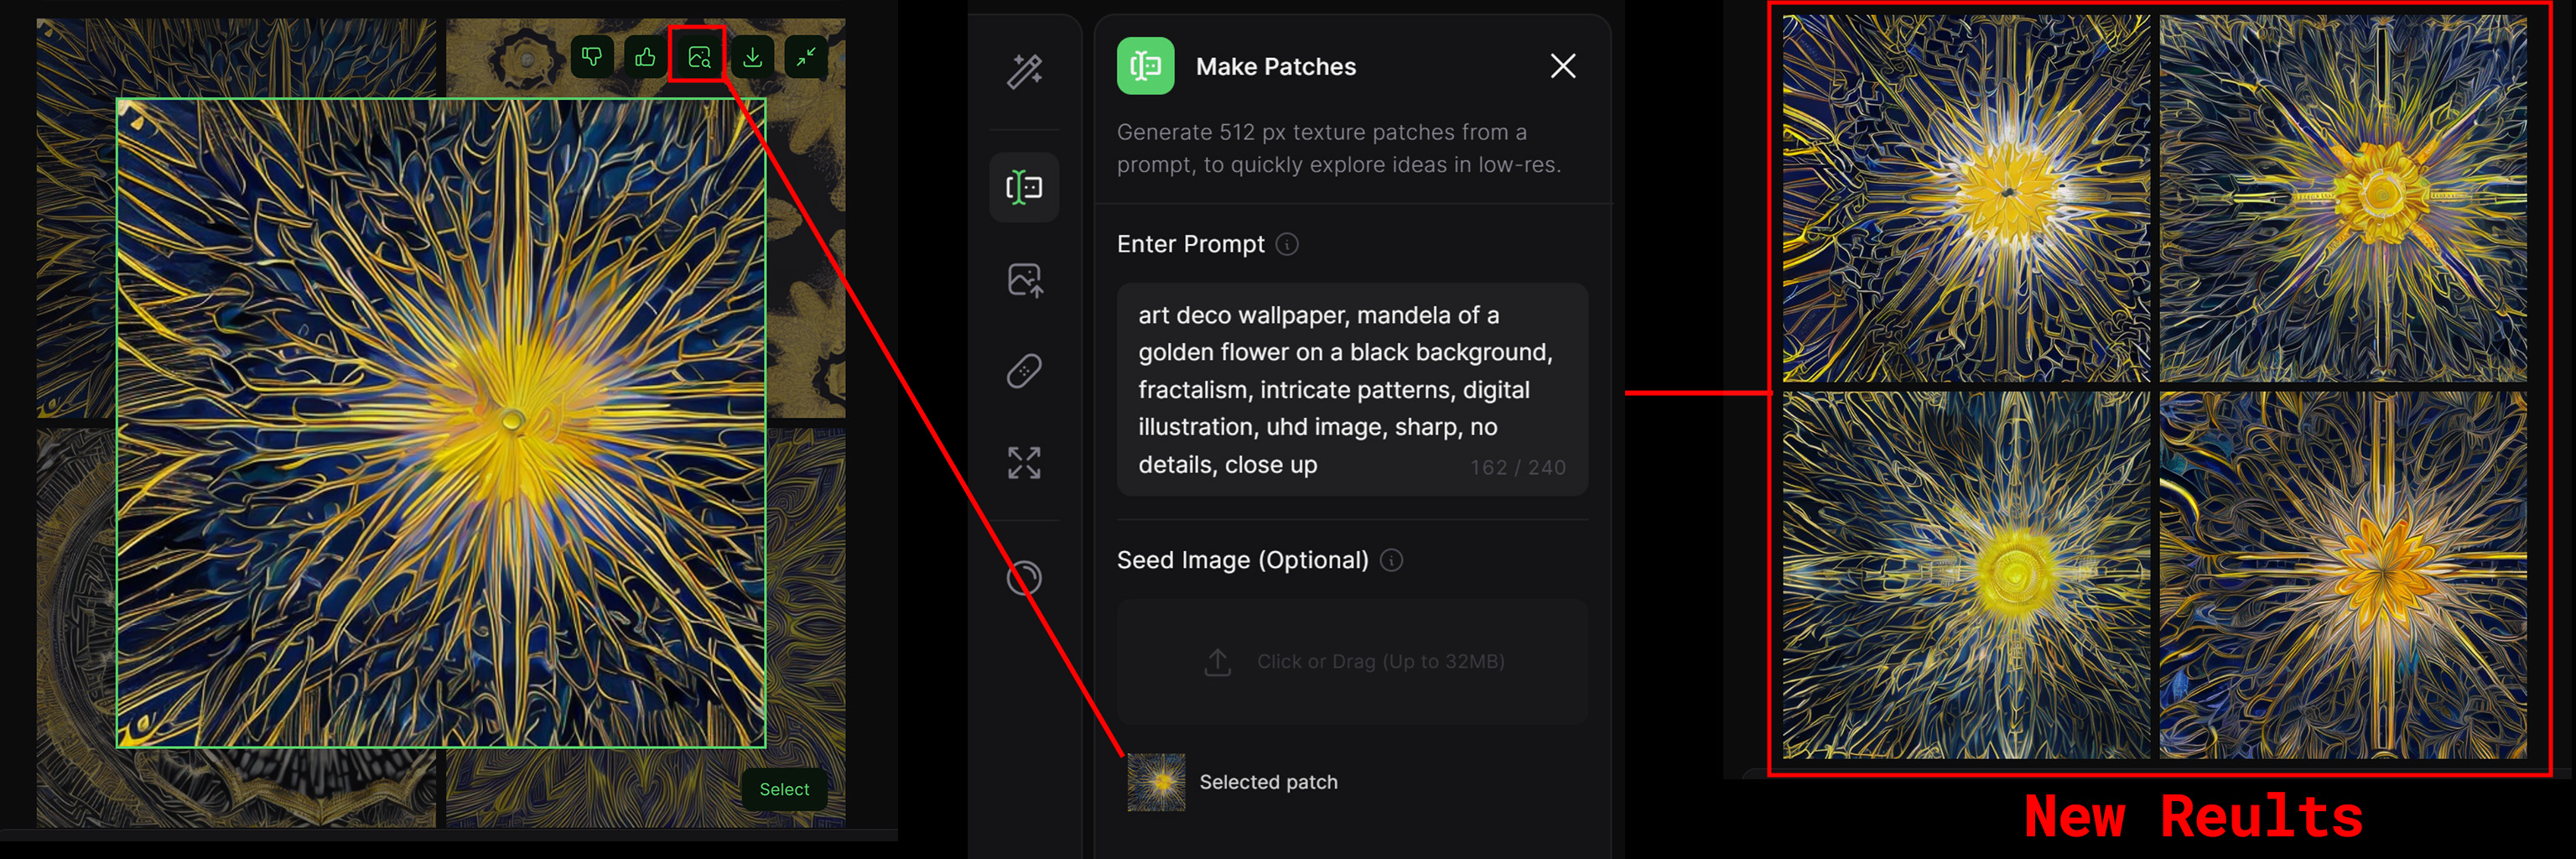
Secondly, you can upload an image to create variations based on it. However, it's important to note that you need to provide a good prompt to guide the AI, ensuring that the generated results remain in context with your uploaded images.
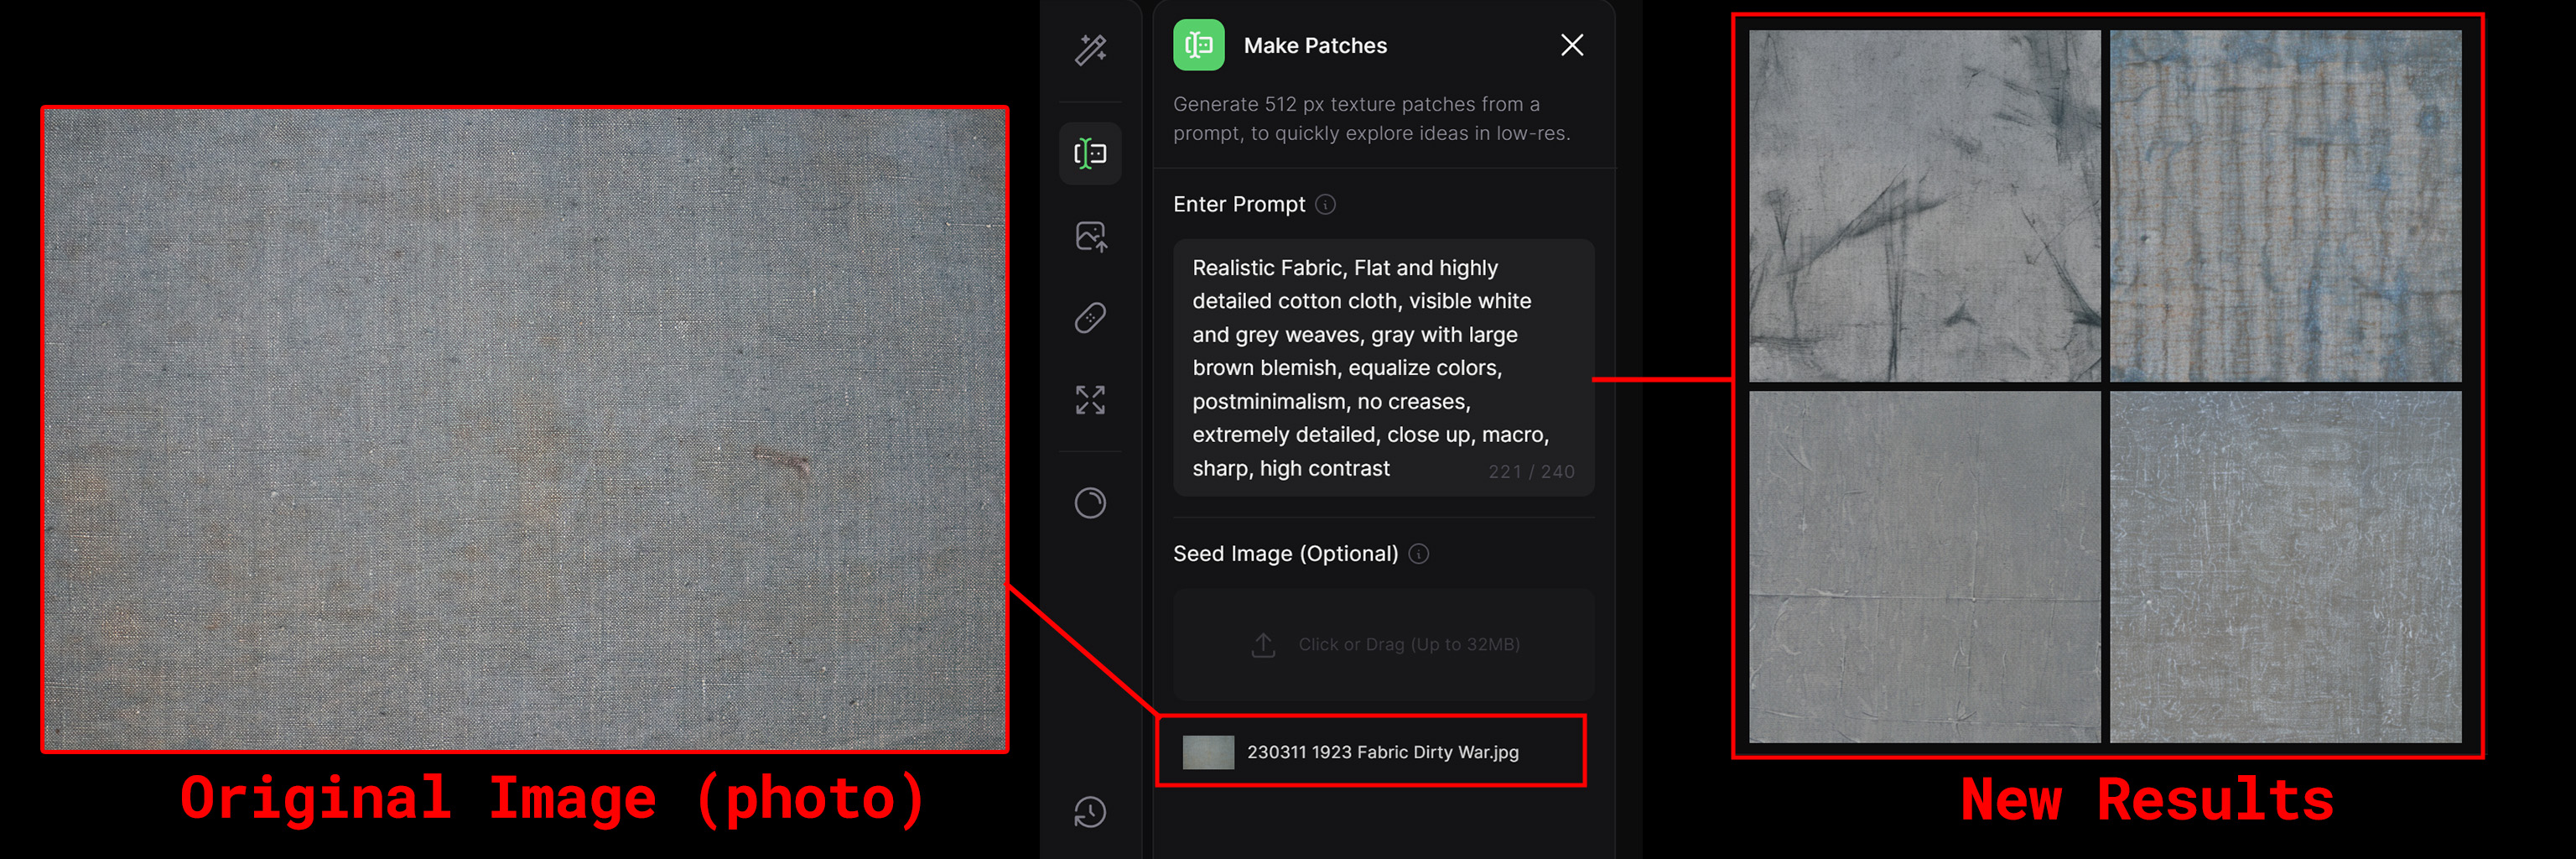
Thirdly, another approach is to download a patch result and edit the image to your liking before uploading it again. This method allows you to steer the AI in generating new images in the direction that you desire. For instance, if the shading on the image repeatedly appears in every new generated patch, you can remove it using programs such as Photoshop, Substance, Capture One, or Affinity Designer to avoid getting stuck in a loop. (see video for the procedure)
Video: Seed image workflow
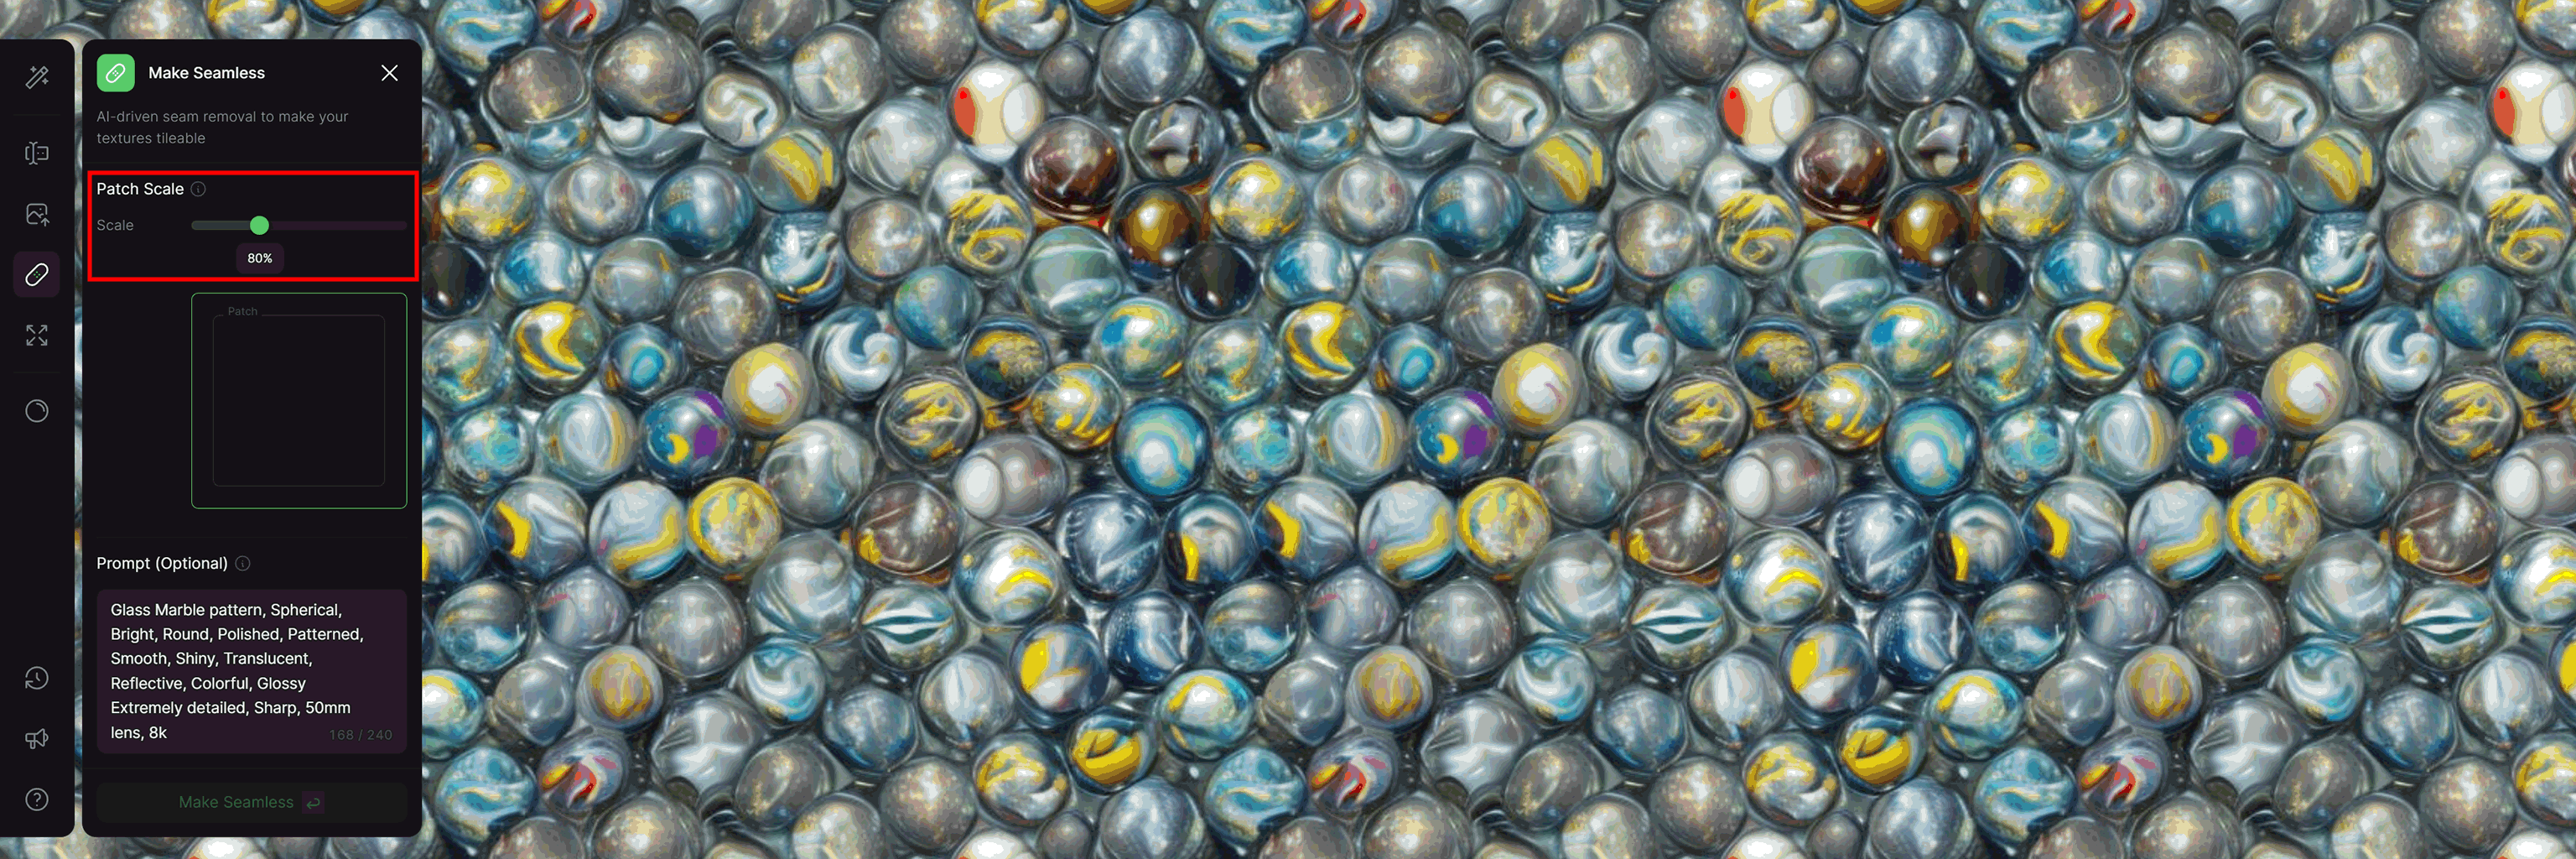
3. Making a image seamless so you won't see a tile
Creating seamless textures with AI requires a slightly different approach than our traditional methods. With WithPoly, it is possible to generate content outside the captured/generated image. Whether you are using your own image or a result from the generated patches, the prompt is crucial in guiding the AI to create a seamless texture with content that is relevant to your intended outcome.
Based on my experience:
a. I have found that the best scaling results for my uploaded images are achieved by setting the seamless slider between 90% and 120%.
b. When using the patches generated by WithPoly, the resulting image may tile up to 50%, depending on the content and the quality of the prompt.
c. Sometimes, achieving a good tile can be as simple as adjusting the slider by just 1%. Make small adjustments and observe the effects before making any major changes.
4. Determining size and tile quality of the image
Estimating the size and quality of a generated texture can be challenging. Usually there is no reference to a specific image or optical measurement available. However, one approach is to project the low-res version of the texture over the actual 3D model. This way, you can test the quality and count of the tile, estimate the physical size that the image represents and choose the upscale resolution for your final PBR maps.
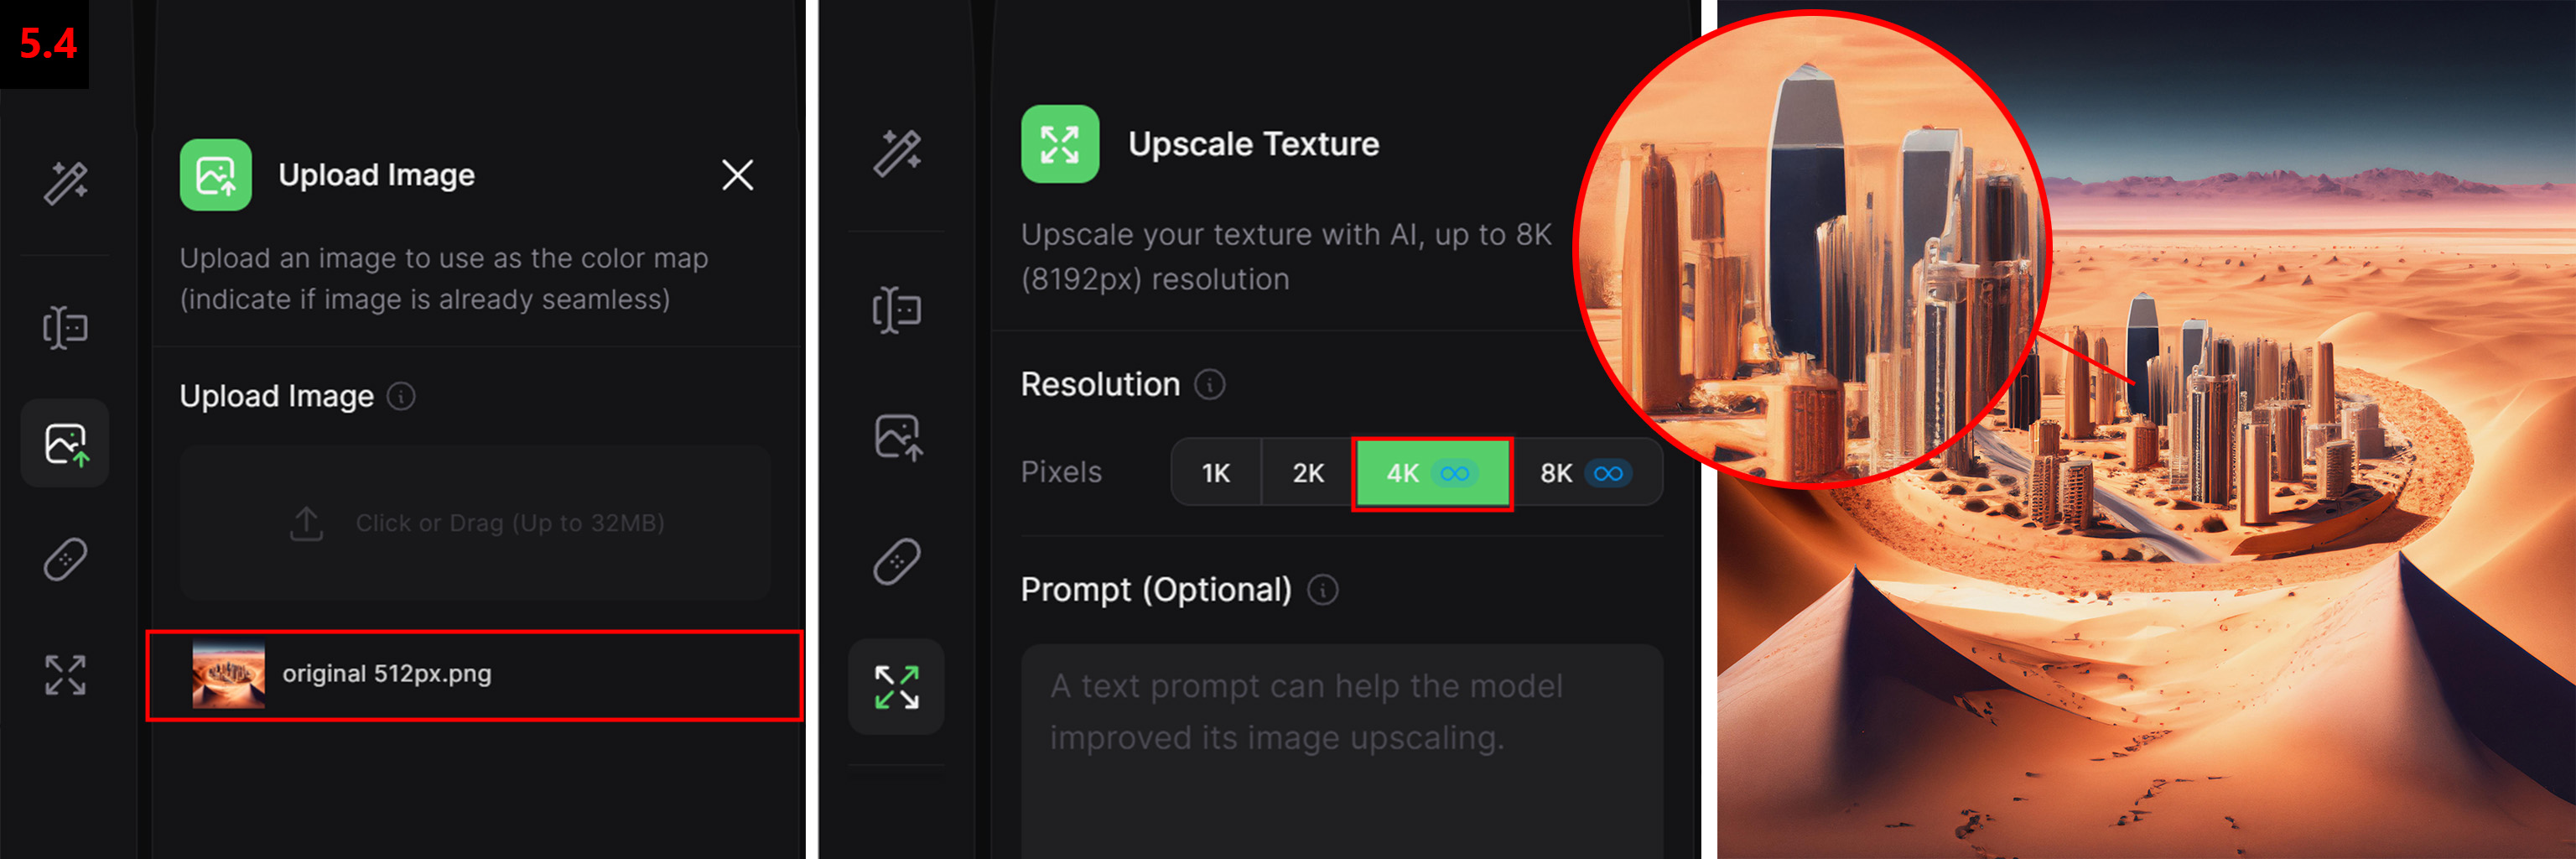
5. Upscale 8k all the way!
As tempting as it sounds to upscale to enormous resolutions it doesn’t always work out in your favor. First of all this has nothing to do with the resolution of your display that is connected to your computer, but with the uv-space of your 3D model that is visible in the rendered image.
When we look at the apple we see approximately half of its original surface in the render [5.2]. The texture has been tiled 2 times to display the correct scale [5.1]. The total resolution of the render is 4096x6144 pixels and the size of the apple on this image is 1024x1024 pixels[5.3]. To calculate the necessary texture resolution, we divide the visible UV-space by 2 to account for the apple's size in the rendered image and then multiply by 2 to account for the texture tiling, resulting in 1024x1024 pixels. To ensure a safe margin, we can multiply this resolution by 2, resulting in a final texture resolution of 2048x2048 pixels.

Let's move on to something a bit more lightweighted after our previous mathematical challenge. Do you have an image that needs to be upscaled, but you don't require a texture? No problem! You can easily upload any image you want and upscale it to the desired resolution. [5.4]
6. Generating the PBR maps!
After all your hard work it’s finally time to create the PBR maps and download the textures. To create the final PBR maps we have to choose a material type:
General
A balanced PBR generation that works for any materials that don’t fall under any of the following categories.
Matte
PBR generation for flat and matte surfaces Best for: clay, cardboard, tiles, roof, plank, rubber, paper, etc.
Fabric
PBR generation for all kinds of fabric, textiles and soft surfaces Best for: carpet, wool, leather, fur, cloth, rug, etc.
Dramatic
PBR generation for heightened displacement and more drastic depth Best for: Cliff, cobblestone, rock, brick, bark, pebbles, etc.
Organic
PBR generation for organic materials in nature, with considerable displacement Best for: bark, dirt, concrete, asphalt, gravel, ground, debris, etc.
Shiny
PBR generation for smooth and shiny surfaces Best for: ceramic, metal, parquet, plastic, tiles, etc.
Diverse
PBR generation for uneven surfaces with various displacement scales Best for: climber, historical, lava, sand, jungle, etc.
Polished
PBR generation for polished surfaces, with visible gloss and sheen Best for: marble, tiles, porcelain, crystal, wooden planks, etc.

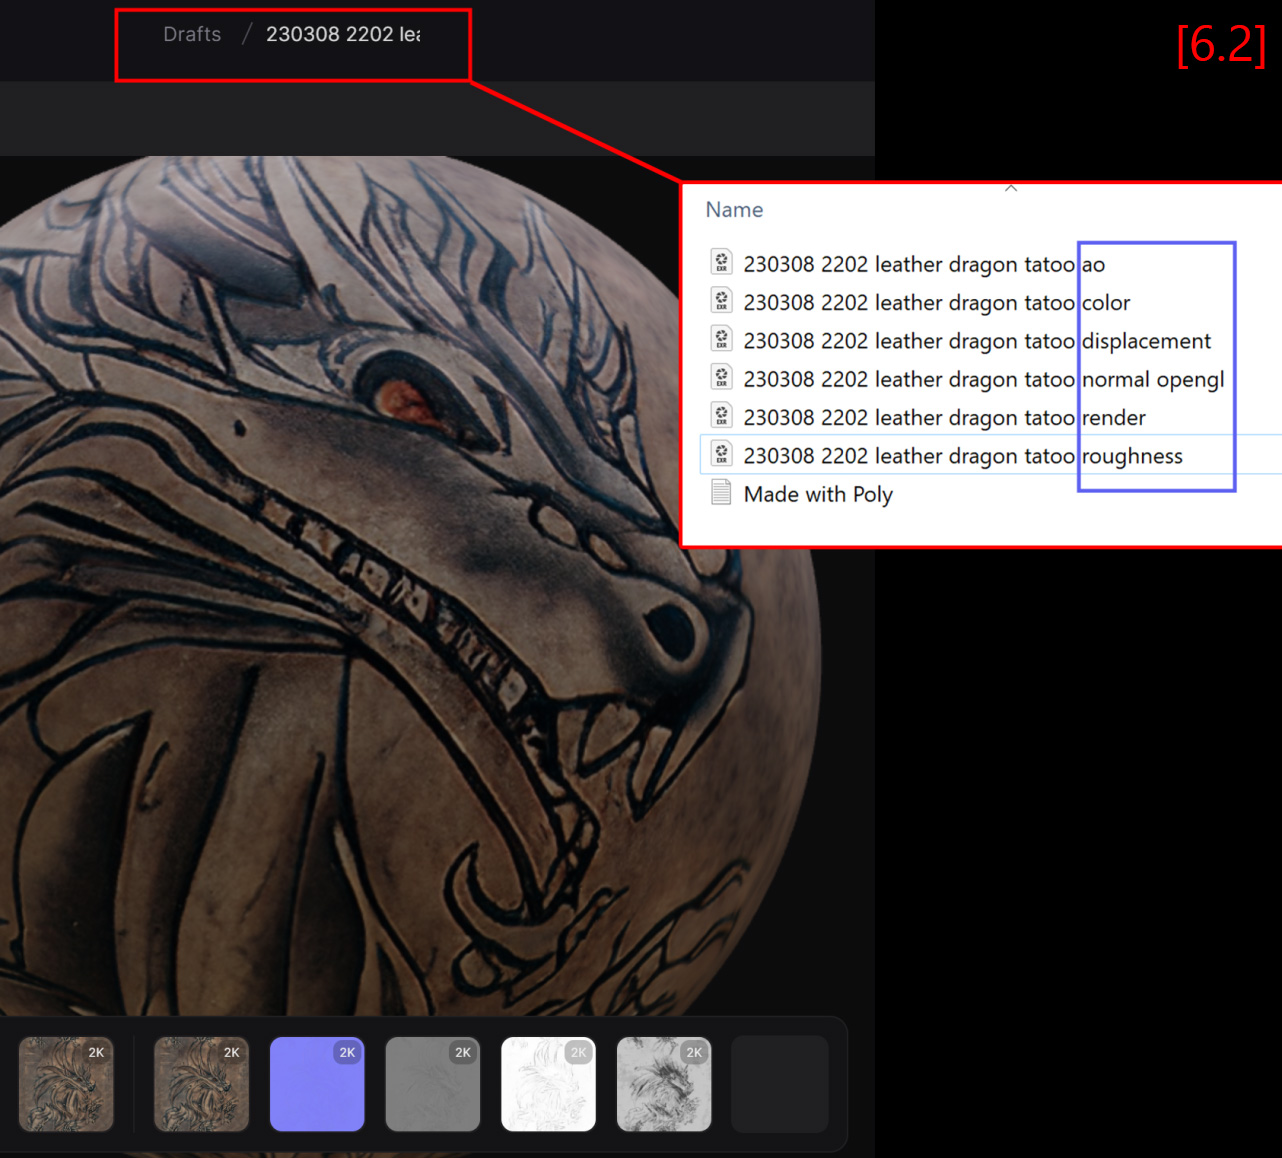
It's important to tick all available texture maps, and keep in mind that with Cinema 4D and RedShift, you can make final adjustments in the RedShift material. However, the closer you get to the desired end result during the generation process, the better. Once you're finished, be sure to download the 32-bit EXR files instead of the JPG compressed previews and make sure all maps get identical names. [6.2]
Note that the "use render map as color" option is a representation of how the final result should look if all maps are stacked in a neutral lighting environment. In most cases, this image will appear slightly darker than the albedo texture.
7. Create your RedShift material library in Cinema 4D!
You may think you're done with the workflow, but there's one last crucial step. To work with textures in Cinema 4D and RedShift, you need a material, ideally a standardized one for all your WithPoly textures. Fortunately, I've created a free base material that you can use for all your textures, allowing you to build your own texture library and easily tweak and fine-tune the materials. (download here!)
8. Closure
WithPoly is an exceptional resource that has exceeded my expectations. It effectively solves a specific problem, it's user-friendly, and its philosophy is forward-thinking. Even if you're not a 3D specialist but for example a stylist or interior designer you can be part of the production process. Furthermore, it seamlessly integrates with existing Cinema 4D and RedShift workflows.
Please feel free to reach out to me if you have any questions or would like to learn more about Cinema 4D, RedShift, and WithPoly. At Baked Pixels, we offer not only training and certification but also consulting and implementation services to help you get the most out of these tools. Don't hesitate to contact us if you need any assistance!
Written by: Emile de Lat
Maxon Cinema 4D Master Trainer
Excited to see what the future holds for the development of www.WithPoly.com


